Quantcast
Channel: frozen wings
Viewing all 199 articles
Browse latest View live

Roti Paun

$
0
0

As i've mentioned in my Terengganu introductory post earlier, Roti Paun is a popular kind of buns found in Terengganu and from what i understand , these buns are really small..like almost half the size of our ordinary buns, super soft and taste buttery. Roti paun started with just plain buns but now they have various fillings like red beans, coconut, kaya, margerine and they can be found along many streets in Terengganu, thanks to Kak KNor from Secubit Garam for telling me that. Something funny about me regarding this MFF event is that, you know when it first started with Malacca month, i was so excited to learn and know of the various popular traditional food in malacca that made me feel like going to malacca straight away, taste the food and buy some nyonya ware back home. The same thing happened last month with Sarawak, i wished i can just fly over to sarawak and savour all the delicious food there like kolo mee, kompia and many more. And now this week i actually feel like going to Terengganu! i think by the end of this MFF event, i would want to travel to all the states in Malaysia!


The method here i'm using is gelatinised dough method from Alex Goh which i tried many times at home for my simple buns as seen in here and here. If you too want to make some roti paun to share it with us this month, use any of your favourite basic dough recipe and feel free to use any of  the fillings i mentioned just now.

get ready cubes of butter
wrap the dough with a cube of butter inside


Recipe ( with reference from Nasi Lemak Lover and www.bisousatoi.com )
makes around 28 little buns
Basic sweet bread dough recipe
A 100gm bread flour
    70gm boiling water

B 300gm bread flour
    100gm plain flour
    80gm sugar
    6gm salt
   20gm milk powder
   9gm instant yeast

C 175gm cold water
    60gm cold eggs

D 60gm butter

Filling
cold butter cubes

For glazing:
melted butter

Method:
1. Add the boiling waetr from A into flour, mix well to form a dough. Cover and set aside to cool. Keep in the refrigerator for at least 12 hours.
2.Mix B until well blended. Add in C and knead to form rough dough. Add in A and knead until well blended. Add in D and knead to form a smooth dough. Let it proof for an hour.
3. Divide each dough into 30gms, shape iinto round again. Flatten the dough and put in a cube of butter inside and seal well. Let it proof in the baking tin for another 40 minutes.
4. Bake in a preheated oven at 190C for around 12-15 minutes. Once they are out from oven, glaze with melted butter. ( i forgot to glaze!! )


I am submitting this post to Malaysian Food Fest ( Terengganu month ) hosted by myself


also sharing this with BYOB( Bake Your Own Bread ) hosted by GirlichefDelectable Musings and My Discovery of Bread


World's Quickest Yeasted Coffee Cake

$
0
0

The title says it all, quickest form of yeasted bread. No proofing required and the dough rises as the oven heats up. Well, i dont really expect it to be as tender and soft like a normal bread since no kneading and proofing needed. Nevertheless, it's quite nice to be eaten when it's still warm and recommended it to be eaten on the same day. Since i made them like balls, it's like eating doughnuts, not a fluffy doughnut..like a little dense bread. If you are expecting some kind of a fluffy pillowy texture, then this might disappoint you. The bread is topped with a sprinkling layer of cinnamon and sugar followed by a mixture of corn syrup and brown sugar and some nuts to finish it off, not a bad combination to me..but quite sweet for me.  If you notice most of my baking recipes, i usually scale down to half cos i dont have a big family to feed and this only makes 5 muffin sizes. Yea, that little. To summarise, these are quick to make and quick to finish. I here have adjusted the quantity of syrup and sugar amount ( not what i put in earlier ) just in case if anyone interested to make it.


this is how it's inside..

Oh, i forgot to mention that this is the yeasted bread that i am baking along with my buddies, Joyce and Zoe this week and the linky will be opened for 7 days from today. We will be baking linzertart next, Nov 12, everyone is welcome to join. Any enquiries regarding the event, do write to me, joyce and zoe. Thanks!


Recipe ( from Cake Keeper by Lauren Chattman) with modification
makes 5 small yeasted bread
Ingredients
85gm milk
28gms unsalted butter (divide into 2 parts, 14gms each)
2 tsp instant yeast
110gm hi protein flour
1/4 tsp salt
3tbsps sugar
1/2 tsp cinnamon
28gm dark corn syrup ( i used golden syrup)
30gm light brown sugar
1/4 cup chopped pecans ( i used pistachios)

Method:
1. Line your muffin pan with double layer of cupcake cases. Heat the milk and 14gms of butter in a small saucepan until the butter is melted and the milk is warm to the touch. Pour into a large mixing bowl and whisk in the yeast to dissolve. Stir in the flour and salt and beat with an electric mixer on medium speed until you have a sticky dough. Divide the dough into 5 portions and shape round. Put them into the cupcake cases.
2.Combine the granulated sugar and cinnamon in a small bowl. Sprinkle the cinnamon sugar evenly over the dough.
3. Melt the remaining butter. Combine the corn syrup, brown sugar and melted butter in a medium bowl and stir. Spread over the dough and sprinkle chopped buts across the top.
4. Place the pan in a cold oven, turn the heat to 350F/177C and bake till golden and set in the center, about 20minutes. Let cool slightly and serve warm.


get the InLinkz code

Stuffed Crabs ( Ketam Sumbat )

$
0
0

Stuffed crabs is a very popular dish found in Kemaman, another district of Terengganu. It is something like a ' must eat ' food for tourists visiting there and not just that, i read that people purposely make a stop in Kemaman on the way to or back from their holidays in Cherating just to taste these crabs. If you google ' stuffed crabs kemaman' you will be able to find a list of pages on this subject alone. So i'm here today trying to replicate this famous kemaman crab dish at home judging from how people described, "stuffed with crab meat and veggies" and with a little discussion with Wendy and also tips from my mum.


Initially i made this earlier using ready cooked crab meat, then something was wrong somewhere and the 2nd time i made this, i bought the crabs and did the peeling myself , it was not a nice job doing that but i needed to try. If you plan to cook this in the future, you can actually get the ready cooked crab meat from sellers and  also ask them for the shells, i believe that they will have it, saves time but here i just want to show you that even if you are not able to get the ready cooked crab meat, you can still do it from scratch. I bought 5 crabs and after peeling the crab, the stuffing itself are just nice enough for 5 shells.

To obtain the crab meat, clean and boil the crabs first..


boil them for about 4-5 minutes or till cooked, then you can start peeling them
mix the ingredients and seasoning, dust the inner part of shells with flour and stuff in the filling
another coat of flour before frying. slowly put them into the hot oil. During the frying process,
reduce the heat to medium low, they will kind of float to the top
when cooked.


Recipe
Ingredients
Crab meat  240gm
1 medium size onion, cut into small cubes
carrot, an inch, cut into small cubes
2 water chestnut, cut into small pieces
some coriander leaves

Seasoning
1/2 tsp salt
1/2 tsp chicken powder
1 egg, beaten
1 tsp tapioca /cornflour
dashes of white pepper

oil for deep frying and extra tapioca flour for coating

Method
1. Mix all the ingredients together in a bowl and put in the seasoning, mix them till well combined and leave them for 10 minutes.
2. Dust the inner part of shells with a little flour , stuff the filling into the empty crabs shells and before frying, coat the filling layer with flour again.  Repeat with the rest and deep fry them in hot oil, takes just about 4 minutes to cook each shell.


I am submitting this post to Malaysian Food Fest ( Terengganu Month) hosted by frozen wings


Danish Chocolate Streusel Swirled Coffee Cake

$
0
0

Here at The Home Bakers ( THB), a baking group which i'm currently attached to is now moving to our 10th bake. We are presently baking from the book, Coffee Cakes by Lou Seibert Pappas and as at today, we have completed 10 recipes from the book! Anuja from Simple Baking  has picked this recipe for us to bake this round , the first bread kind that we are baking from the book thus far, Danish style. The fun part was shaping the dough even though i dont quite understand the instructions given to shape the dough. The loaf was surrounded by some chocolate streusel that makes it delicious, however i suspect that i had overbaked mine at a higher temperature cos resulting that my loaf came out not as moist as i wanted them to be. I was too 'smart' to never follow the temperature given in the book and baked them at a higher temperature.. The temperature given in the book was 160C but i set mine at 170C ..as far as i remember, i've never baked a bread at such low temperature .After reading the question and tips section that the group members shared after baking, i'm quite certain that it was  a mistake i made..  To get the full recipe, please hop over to Anuja's blog and to view the group baking, you can click here.

after rolling up the roll, cut the loaf at 3/4" intervals, cutting 3/4 of the way thru the dough.Pull and twist
each cut side slice on its side to lie flat on alternative sides...


Palm Sugar with Coconut Jelly

$
0
0

I quite like the pattern formed on these agar agar, jelly. I thought it looks something like the terrazo flooring in my old house where i stayed when i was small. It is quite easy actually to make this agar agar, first we make the coconut jelly and once they are set, you just cut them into shapes. Then we can proceed to make the palm sugar agar agar and just pour it on top of all the coconut jellies that has been cut out and leave to set. Though it may seems that you are seeing a lot of these coconut jelly shapes in the agar agar, it is nothing rich in terms of flavour, just light and refreshing.


On a sidenote, just to inform that we are now moving into the 3rd week of the Terengganu Food Fest online event. The response so far has been encouraging, thanks a lot! If you have not participated yet or do not have any ideas what to cook for the event, just click here for some ideas or check our Facebook Page to see what others have been making to get some inspiration. There are still 2 weeks left to go before we move on to the next state ie Kedah. All are welcomed to join! Any enquiries, just drop me a mail or leave a comment, i will get back to you as soon as possible. You can also check out the FAQ here, thank you!


Recipe ( pattern inspired by here )
Coconut Milk Jelly
2.5tsp agar agar powder
120ml coconut milk
180ml water
1tbsp sugar

Method:
Combine agar agar powder, water and sugar in a small pot, stir and bring it to a boil till sugar dissolves. Put in the coconut milk, bring to a boil, let it simmer for about 2 minutes. Remove from heat, pour into a tray and let it cool to set. You can then use a cookie cutter or a knife to cut them into shapes you want and lie them on a tray.

Gula Melaka Jelly
6gm agar agar powder
450ml water
45gm palm sugar ( gula melaka), crushed
1 tbsp brown sugar

Method:
Combine everything in a pot and let it boil till palm sugar is dissolved. Let simmer for abt 2 mins. Remove from heat and pour the solution onto the tray with coconut jellies. Leave to cool to set. Chill in the fridge.

I am submitting this post to Aspiring Bakers #24 ( October 2012 ) Jellies and Puddings hosted by Charmaine of Mimi Bakery House


Ayam Percik Terengganu ( Spicy Grilled Chicken )

$
0
0

Ayam Percik is also one of the many favourites particularly in the east coast, Terengganu and Kelantan. When i was searching for information for my Terengganu introductory post earlier, i learnt that both Terengganu and Kelantan has their very own version of ayam percik. Both has a slightly different way of cooking from one another, their gravy are rich in flavours that comes from  a blend of ingredients like coconut milk and spices but the Terengganu's one has added chilli paste bringing it a more spicy flavour. You look at the picture below and you can see the difference. The gravy for ayam percik Kelantan is white whereas the ones in Terengganu is red due to the addition of chilli paste. What i'm posting here today is of course the Terengganu version. I'll probably make the Kelantan version when the Kelantan Food Fest comes next year.

this is the Ayam Percik Kelantan,  white gravy
photo source : kuali.com


The chicken here is firstly marinated with some spices and then barbequed or grilled till they are cooked and slightly charred..I like them to be a little charred. When the chicken in ready, pour the sauce all over and you can get ready your rice!

Recipe ( from Dapur Malaysia ) with some changes
Ingredients
1/2 chicken ( i used 2 wings, 1 chicken whole thigh and 1 part of breast )
For marinate
4 shallots
1 clove garlic
 1 part of ginger, about an inch
1 stalk lemongrass ( white and little green part)
1/2tbsp of coriander seeds ( biji ketumbar )
1/2 tbsp of cumin seeds ( jintan putih )

Pound or blend all the above marinate ingredients and marinate for 30 minutes. Set the oven on grill (broiler) function to cook them ( i grilled them for 220C for 20 minutes) While chicken is grilling, can start cooking the gravy.

For gravy
Pounded ingredients
9 shallots
1 clove garlic
1/2 inch of ginger
oil for frying

4tbsp of cili boh ( chilli paste )
300ml coconut milk (santan )
1/4 tbsp of fenugreek seeds ( biji halba )
3 stalks of lemongrass, bruised
5gm shrimp paste ( belacan )
1/2 cup of water
3/4 tsp salt
pinch of sugar

Method: 
1.In a wok, fry pounded ingredients on med low fire heat till aromatic. Add in chili boh/chili paste, stir well and pour in the 1/2 cup of water.
2. Increase the heat , put in the coconut milk, fenugreek seeds, lemongrass, belachan and stir well to combine. Add in salt and sugar to taste. Let it come to a boil and then reduce fire to simmer and cook until gravy thickens around 30-40 mins.
3. Once ready, pour onto the grilled chicken.


I am submitting this post to Malaysian Food Fest ( Terengganu Month ) hosted by frozen wings

Asam Gumpal/ Sagupal

$
0
0

I do not know the existence of this dessert until it was recommended by KNor from Secubit Garam 2 weeks ago. I was told that it is a very nice dessert that comes from Terengganu and also gave me the link to the recipe. It is called Asam Gumpal or some call it as Sagupal. For those who have not heard of this, they are  steamed sago balls with sweet green beans as fillings inside and served with coconut sauce. I was very keen to try as i have not prepared any sweet desserts yet  for my Terengganu Food Fest. I am happy that i tried that and i'm happy that i liked them. The sago balls are soft and slightly chewy, and the sweet coconut sauce is further enhanced by a little ginger and fenugreek. Thanks to KNor for letting me know about this dessert, i really enjoyed my bowl of asam gumpal and also happy to bring awareness to all of you this nice sweet dessert coming from Terengganu.

green beans are boiled till soft, mashed and cook with sugar till dry 
pour some hot water onto sago, shape into disc and put in the sweetened green bean filling
sago balls..before and after steamed
   

Recipe ( from Malaysian's Sweets and Cakes )
makes 20 sago balls
Ingredients
200gm sago ( i had a mixture of white and some green coloured sagos here)
100gm green beans
salt and sugar to taste ( I used 80gm sugar)
2 cups coconut milk ( I used 200ml coconut milk plus 350ml water ) * see note*
2tbsp sugar
1 inch ginger ( cut into shreds)
1 tbsp fenugreek ( 1 used 1/2 tbsp )

Method:
1. Rinse the green beans and let soak in water for an hour . Drain and let it cook in boiling water till soft, takes about 5-10 minutes.
2.Drain and mash with a fork until mushy. In a nonstick pan, cook the sugar till turns syrup and add the mashed green beans in and let cook till dry. Remove from heat and using disposable gloves, shape the filling into small balls. This will be the filling. Leave them aside.
3. Wash the sagos and pour over hot water, not too much otherwise it will turn too soft.
4. Using a disposable gloves again, take an amount of sago, flatten it and put in the green beans filling and shape them round to seal it. Repeat for the rest of the sagos and fillings. Put them on a steamer and steam for 15-20 minutes. Remove and set them aside.
5.In a medium size pot, add the coconut milk, water, sugar, ginger and fenugreek and let it bring to a boil, stirring it. Put in the cooked sago balls. Done. Can be eaten warm or cold.


Note:
i saved a portion in the fridge and i find that the coconut milk has thickened quite a bit the next day. I added more water and boil it again, just as nice. No problem OR
you can use less coconut milk in the first stage, around 100ml coconut milk and 400ml water, then add sugar to your liking. 


I am submitting this post to Malaysian Food Fest ( Terengganu Month ) hosted by frozen wings

Kayu Keramat/ Fried Bread

$
0
0

Kayu Keramat is another local delicacy that comes from the state of Terengganu. Kayu means wood and i guess that's the obvious reason why the word 'kayu' is used to call these as these kayu keramat are shaped like piece of wood or log. When i first saw the pictures of kayu keramat on the internet, i thought they look like the chinese cruller," yau char kwai", maybe a little shorter and when i ate it, the outer crust actually reminds me of the the chinese ' ham chin peng' and the inside is soft, something like pretzels. They need to be proofed just like doughnuts before frying them. I am very thankful to KNor from Secubit Garam for clearing some of my doubts, i was not too sure on the recipe as i see some recipes use eggs and some dont. I find that these kayu keramat is not sweet , infact they are not meant to be sweet i was told as how people will usually eat them is dunk them into coffee, milo or their favourite drinks. I just got to tell you that it's really nice to eat despite the lack of sweetness, they are soft and kind of fluffy too. I would also think it will be delicious to scatter some cinnamon sugar on it if just eat it plain but that's another thing, i do not want to sway away from the traditional kayu keramat, not in line with the rules of the event :)  I also understand that in Terengganu, they now also have frozen kayu keramat for sale, just like in my hometown now..the famous salt baked chicken, it's also available now in frozen packs so that you can freeze them for later consumption.

This will be my last entry to the Terengganu Food Fest which will be ending in a week's time. Submissions will be opened till end of the month and the roundup will be up on my blog on Nov1st, 2012. If you are interested to see what others have been making, you can click our facebook page here

how i did to shape them was i rolled the dough like swiss roll and cut
them into pieces like above, from there just pull and stretch the dough to
makes it longer. 


Recipe ( from Dari Dapur Madihaa )
half of original recipe, makes around 10 rolls
Ingredients
250gm flour
1/2tsp soda bicarbonate
1/2 tsp instant yeast
3 tbsps sugar
1/2tbsps /8 gm butter
150ml lukewarm water

Method:
1. Put the yeast into water and leave aside for 10 mins. Dissolve sugar in remaining water and put aside. In the mixer bowl, rub in butter into flour and add in the soda bicarbonate.
2.Pour in the sugar mixture and yeast mixture and knead till smooth ( i used my mixer to knead for about 8 mins). Remove the dough from the mixer and let it proof till almost double its size ( i proofed them for almost 2 hours, depending on the temp of your room )
3.Shape them into long rolls and deep fry them till golden brown . ( what i did to shape them was after proofing completed, i rolled them out to a rectangle and rolled up like swiss roll. Then cut then into small pieces and pulled them to shape like a log. When put into the pot for frying, you can pull and stretch the dough again  to make it longer. It takes just about 2-3 minutes to cook them under low fire, in between on and off the fire a few times to control the heat )


I am submitting this post to Malaysian Food Fest ( Terengganu Month ) hosted by frozen wings

Also linking this to Recipe Box 20 hosted by Chaya of Bizzy Bakes

Overnight Yogurt Sunflower Seeds Rolls - # Twelve Loaves

$
0
0

When i saw the theme for this month Twelve Loaves, a monthly baking event hosted by my friend, Lora is Nuts, Seeds and Grains, i knew i got to make something for it. At the same time, i saw these beautiful rolls over at Angie's blog.. seems manageable and the ingredients are fairly common It is also something which i've never tried before for bread making, overnight yogurt fermentation. I made these 2 times, the first time i made them, i found that they were a little too sourish for me due to the yogurt , you see it uses quite a large volume of yogurt here and so the 2nd time when i made them again, i switched to another brand of yogurt, Nestle. I didnt want to make any significant changes to the amount of yogurt used in the recipe, afterall  these are called yogurt rolls. I'm pleased with the results, the crumbs are tender and the rolls give a pleasing sour tang taste. Also delighted to know how easy the shaping was done. Just roll the dough into a square , fold the four sides to meet in the middle , turn the dough over and then just cut them!


The Terengganu Food Fest will be ending in a few day's time. A gentle reminder for those who havent emailed me your entries yet, kindly do so by October 31st, 11.59 pm local time. Please dont make me stay up late that night doing the roundup, LOL!


Recipe ( from Angie's recipes ) with addition of flax seeds and butter
makes 9 rolls
Ingredients
150gm wholewheat flour
230g bread flour
1.5tsp sea salt
3tbsp flax seeds
6gm instant yeast
390gm yogurt
15gm butter

Method:
1. Mix the first 5 ingredients in the bowl of the electric mixer till well combined. You can use a fork to mix.
2.Attach the dough hook to the mixer and put in the yogurt, on the mixer on low speed. Let it knead till it becomes a dough, will take several minutes and put in the butter. The dough will become fairly wet after mixing in the butter. You can sprinkle some flour around the bowl. Let it knead for about 10 minutes.
3. Remove the dough and let it proof overnight ( i proofed the dough overnight in the fridge )
4. The next morning, remove the dough and roll it on a well floured surface to 40cmx40cm square. Fold each side to meet in the middle and flip the dough over. Cut the dough into 9 pieces , brush the surface with water and sprinkle with sunflower seeds. Place them on a baking tray lined baking paper. Cover with a clean cloth and let it proof for an hour.
5. Place a roasting tin at the bottom of the oven and preheat to 250C. Put the bread in the hot oven and pour  some boiling water on to the roasting tin. Close the oven and bake for about 20 mins ( I baked mine at 15 mins )


I'm linking this post to Twelve Loaves with their theme this month Nuts, Seeds and Grains hosted by Cake DuchessCreative Culinary and Lifesafeast


and also linking to BYOB ( Bake Your Own Bread )  hosted by GirlichefDelectable Musings and My Discovery of Bread

Round-Up for MFF Terengganu Month ( Oct 2012 )

$
0
0

The Terengganu Food Fest has now come to an end. I would like to say a big 'Thank You ' to all of you who have participated to made this another great successful MFF month with a total of 70 entries!! Throughout this month, i have enjoyed greatly learning of the various dishes prepared by all of the participants, the communication between us and making new friends. Seriously, i am overwhelmed by the support given to me as a host, the organiser,Wendy and all at MFF.  I know some of you despite the lack of understanding of the malay language in the recipes, you still took the effort and tried. Bravo! I also know some of you who has been so generously sharing hand down family recipes with all of us, thank you so much and how each and everyone inspired one another to make something and also very glad to see many of us who are totally unfamiliar with Terengganu food are willing to search for recipes, came forward and gave it a try ! Give yourselves a big pat! I am sorry that i have also rejected some of your entries but thanks for your understanding! Funny things also happened along the way, how some of you had discovered  relatives and schoolmates thru this event! Astonishing!! I also want to thank non bloggers who had participated in this monthly event, if you are coming by to read this, thank you so much for your participation! Each and everyone's submission is greatly appreciated!!

Starting today, next state on the MFF list is food from Kedah and Perlis. The host for this month is who else, the organiser, Wendy from Table for 2..or more herself.  Kindly hop over to her page here to read the  introduction post on Kedah/Perlis Food Fest. Phew! Now i can take a deep breathe and shake my legs! LOL!! To those who have missed our past events, no problem. It's never too late to join.

I personally would like to thank Phong Hong who hails from Terengganu whom she has shared with us a total of 15 entries, which many of them are her precious family recipes! Thank you very much, Phong Hong! I know you've been working very hard this month! Really appreciate that. Now here is the roundup of all the entries received for the month of Terengganu . Click on the link below the picture and it will direct you to the respective posts. Other than these, you can also check out some other submissions by non bloggers at our facebook page here.

Rice/Porridge/Noodles

Bubur Lambuk Terengganu by Wendyinkk of Table for 2...or more
Laksam Terengganu by Alan of Travelling Foodies

Nasi Minyak ( Ghee Rice ) by Phong Hong of Phong Hong Bakes
Nasi Dagang Terengganu@ Trader's Rice by Wendyinkk of Table for 2....or More

Nasi Dagang with Gulai Ikan Tongkol by Peng of Peng's Kitchen
Mee Rebus Terengganu Style by KNor of Secubit Garam
Terengganu Lor Mee ( Noodles with Gravy ) by Phong Hong of Phong Hong Bakes
Laksam Terengganu by Lena of frozen wings
Nasi Dagang ( Trader's Rice ) by Annie Takeda Mok of Annielicious Food
Terengganu Bihun Laksa ( Bihun Thng Ang ) by Phong Hong of Phong Hong Bakes
Nasi Dagang Terengganu and Gulai Ikan Tongkol by Alan of Travelling Foodies

Seafood/Meat/Poultry

Kay Hong ( Terengganu Braised Chicken ) by Phong Hong of Phong Hong Bakes
Acar Ikan by Mich of Piece of Cake
Kay Hong ( Terengganu Braised Chicken ) by Peng of Peng's Kitchen
Terengganu Braised Chicken ( Kay Hong ) by Esther of the FUSS FREE chef
Gulai Nasi Dagang by Queenie of Semalam Berlalu Esok Menanti
Ayam Percik By Mich of Piece of Cake
Terengganu Braised Chicken by Fong of Fong's Kitchen Journal
Gulai Ikan Tongkol Terengganu@ Tuna Curry by Wendyinkk of Table for 2 ....or More
Terengganu Beef Curry (Kerutup Daging Terengganu) by Phong Hong of Phong Hong Bakes

Kay Hong ( Terengganu Braised Chicken ) by Bee Bee of Honey Bee Sweets
Kay Kutuk ( Terengganu Chicken Curry ) by Phong Hong of Phong Hong Bakes
Stuffed Crabs ( Ketam Sumbat ) by Lena of frozen wings
Ayam Percik by Lena of frozen wings
Sotong Sumbat ( Stuffed Squid) by Hody of Cook 4 You & Me
Ayam Percik Terengganu by Queenie of Semalam Berlalu Esok Menanti
Sambal Ikan Tumis Ikan Tongkol by Peng of Peng's Kitchen
Kay Pachok ( Skewered Chicken ) by Phong Hong of Phong Hong Bakes
Gulai Ikan Tongkol( Spicy Curry Tuna) by Annie of Annielicious Food
Stuffed Crabs ( Ketam Sumbat ) by mui mui ( Doreen ) of my little favourites DIY
Terengganu Braised Chicken ( Kay Hong ) by Mel of Through The Kitchen Door
Ikan Cencaru Sumbat ( Spicy Grilled Fish ) by Mich of Piece of Cake
Terengganu Braised Chicken by Alice of ILoveICookIBake
Terengganu Braised Chicken ( Kay Hong ) by Cindy of yummylittlecooks
Terengganu Braised Pork by Adeline of Lite Home Bake
Kay Pachok by Adeline of Lite Home Bake
Kay Khong Eam ( Chicken with Garlic & Salt) by Phong Hong of Phong Hong Bakes
Ketupat Sotong ( Stuffed Squid with Glutinous Rice ) by Alan of Travelling Foodies
Kay Hong ( Terengganu Braised Chicken ) by muimui( Doreen) of my little favourite diy
Kay Pachok ( Skewered Chicken ) By Shannon of Just as Delish


Roti Paung
Roti Paung ( Terengganu Butter Buns: Old School Method ) by Phong Hong of Phong Hong Bakes
Roti Paun with Red Bean Paste by Bee Bee of Honey Bee Sweets
Roti Paun by mui mui ( Doreen ) of my little favourite diy
Roti Paun by Lena of frozen wings


Vegetables/Salad/Egg
Terengganu Chicken Salad ( Kay Chenh) by Phong Hong of Phong Hong Bakes
Terengganu Green Salad ( Nui Chenh) by Peng of Peng's Kitchen
Terengganu Papaya Salad ( Gohnyok ) by Phong Hong of Phong Hong Bakes
Rojak Betik Terengganu ( Terengganu Papaya Salad ) by Gertrude of My Kitchen Snippets
Telur Rebus Lemak Kuning by Hody of Cook 4 You & Me
Sayur Lemak Kulit Rambai by KNor of Secubit Garam


Dessert/Kuih/Cakes/Snacks

Pulut Lepa by Queenie of Semalam Berlalu Esok Menanti
Lompat Tikam by Wendyinkk of Table for 2 ...or More
Kuih Belimbing by KNor of Secubit Garam

Mohor ( Steamed Sweet Potato Buns ) by Phong Hong of Phong Hong Bakes
Kuih Puteri Mandi by Hody of Cook 4 You & Me
Kuih Lompat Tikam by Vivian of Vivian Pang's Kitchen
Kuih Tepung Bunga by Joyce of Kitchen Flavours
Bentng ( Three Layer Egg Custard Cake ) by Phong Hong of Phong Hong Bakes
Apam Kastard by mui mui ( Doreen ) of my little favourites DIY
Asam Gumpal/Sagupal by lena of frozen wings
Kuih Qasidah by KNor of Secubit Garam
Kayu Keramat/Fried Bread by Lena of frozen wings
Bronok ( Kuih Sagu ) by Joyce of Kitchen Flavours
Bekang by Phong Hong of Phong Hong Bakes
Terengganu Akok by Phong Hong of Phong Hong Bakes
Kuih Tepung Bunga by Cindy of yummylittlecooks
Kuih Akok Terengganu by Cindy of yummylittlecooks
Sira Ubi Kayu by KNor of Secubit Garam
Pulut Lepa/Pulut Panggang by Alan of Travelling Foodies
Kuih Menganang by Alan of Travelling Foodies
Kudos to everyone!

Banana, Macadamia Nut and Coconut Coffee Cake

$
0
0

I was so busily involved with my Terengganu food fest recently that i had actually forgotten that our latest THB ( The Home Bakers) bake was due yesterday. But no problem, we are given 4 weeks period to post this up, very flexible. I have not got the post ready yet therefore i quickly organised my photos last night. If any of you are interested  to join THB, do contact Joyce for further details. Currently, we are baking from the book Coffee Cake by Lou Seibert Pappas and we are now into our 11th bake from the book. Kit from I-Lost in Austen , another member of the group had picked this Banana, Macadamia Nut and Coconut Coffee cake for us to bake . Do visit Kit's blog if you havent done so. I'm sure you will be impressed with her beautiful cakes, pictures and also flowers from her garden! I always have the impression that Kit is a very romantic lady, i might be wrong but whenever I visit her blog, i feel like i''ve been taken to a beautiful place, a cottage garden ..and birds singing..LOL!


Thanks Kit for choosing this lovely banana coffee cake. It is a very moist cake and i love the addition of coconut flakes in the cake and also the macadamia nuts cinnamon sugar topping..yum! I baked half a recipe in two small 4 inch round pan, did made a little adjustment to the recipe ie reduced the baking powder to 3/4tsp and increased the baking soda to 1/2 tsp , used yogurt in replacement of sour cream and have used 135gms mashed bananas in weight. To get the full recipe , please visit Kit's blog and to see group baking, click here


Linzer Blitz Torte

$
0
0

Had an unfortunate encounter last week. My handbag was snatched when i was walking on a road .Thank god that i was not hurt, i did not fall down, only my wrist and arm hurt a little the next day. This guy on motorbike came from behind and pulled my handbag away and after a few seconds, i realised that my handbag was snatched by him. I was not alert enough, that road was actually quite quiet at that time, there were no passer by around too. Really i was so frustrated and angry over the whole incident ...i was not in the mood to blog last week, all my bank and credit cards, identification card, driving licence, medical card and my phone were all in there and i'm not sure about other malaysian friends, the thought of going to the govt services dept to replace the card and driving licence makes me scared..thinking of the long queues.  And you know something , when i went to lodge a police report that evening, the police officer asked me a question that really boils me up. After hearing what i told him and what happened, he asked in malay " apa tujuan cik untuk melapurkan kes ini? "I was like HUH??! I just wanted to make sure i understood the question correctly and asked him to repeat his question. " apa tujuan cik untuk melapurkan kes ini? again he asked. At that moment i couldnt help but to raise my voice, " HUH?? APA TUJUAN??! KENA RAGUT TAK PAYAH LAPURKAH??!! " So Angry!!! In English, the police asked me what was my reason for making a police report and i said to him, 'what?? for what reason??! you mean i dont have to report even if my bag is snatched??! He looked at me and smile. What if my cards are being misused and abused later?? Really i dont know how to answer that question and was actually taken aback hearing he asked me that..but i was glad that i didnt go thru a hassle getting my ic and driving licence replaced, the govt departments were super efficient this time when i went and did my documents. I'm very very thankful that i'm all alright and no hurt came upon me unlike some that we read in the papers that were being pulled and dragged on the road, that was horrifying!


It has been quite some time since our last bake along as my buddy, Zoe was away for a couple of weeks. This linzertorte  idea was picked by Joyce and prior to this, i dont know much what is a linzertorte. Though i 've heard of it, I do not know really know what exactly goes into the tart. After some googling, i found that most linzertart or linzertorte use raspberry jam as the filling over a buttery crust made with almond, hazelnut or even walnuts. Also the lattice top i believe is one of the characteristic of a linzertart. But today i'm not making a lattice top, i found something much easier to do than making a lattice design.. from here. Instead of cutting the strips to form lattice, the dough was grated and scattered all over the jam. I quite like the patterns that form just from the grating the dough, the tart was delicious and the buttery crust is not overly crispy, just soft and slightly crispy.


i ought to practise more on making crusts .the base of  my crust is a little thicker here:)


Recipe ( from serious eats )
1/2 recipe of original recipe , makes one 7 inch torte
1.87oz ground almonds
2.25oz flour
2oz sugar
1/8tsp salt
1/s tsp cinnamon
2.75oz butter, cut into chunks, slightly softened
1/2 egg yolk
some orange zest
3.5oz raspberry jam

Method:
1. Combine the almonds, flour, sugar, cinnamon, salt in a food processor and pulse a few times. Add the butter, egg yolk and orange zest and process till just blended.
2. Measure 1oz of the dough and shape into a ball.( for slicing/grating).Wrap and refrigerate it. Meanwhile grease the sides a cake pan and line the bottom with parchment paper. Press the remaining dough evenly over the bottom of the pan.Cover and refrigerate it for at least an hour ( i left them at the fridge for almost 3 hours)
3.Position the rack in the lower third of oven and preheat oven to 350F/177C. Spread the jam evenly over the base of the dough, leaving 1/2inch border all around. Using a grater, grate the chilled reserved dough ball over the jam.
4. Bake for 30-35 minutes until top is golden brown. Tent the torte loosely with foil and bake for 10-15 mins longer until it is golden brown. ( i baked for additional 5 mins ) Cool the torte in the pan for 20 minutes . Use a small knife or spatula around the sides to release the torte. Invert the torte into a plate , remove the parchment paper, then turn the torte upside up.


get the InLinkz code

Easy Gourmet Pumpkin Soup

$
0
0

This is my first time making a western kind of soup. Dont think that i do not like western soups, no ..it's because i do not know how to make them. I can tell you that i dont even know how to make mushroom soup. I was very delighted when i saw my sweet friend, Bee Bee posted her pumpkin soup as this is one of my favourite. Of course, sometimes we can just get the recipe from the internet but there's always some inspiration when you see your friend making it and you just want to follow. Thanks, Bee bee.The first time i made this, i had it with some Brazilian Quick Rolls and it was so nice. It is rich and flavourful! Then another time, i had some garlic rolls to eat along. Yum! As of more recent, i also see some of you making broccoli cream soup, potatoes and pea soup, leek and potatoes, creamy chicken soup...i'm learning from all of you! i think from now on, i should make some chicken or vegetable stock and store them, they are just very handy when i want to make some soups. Have a nice weekend, everyone.

i prefer mine with less dairy so i only added about 3 tbsp of cream towards the end of cooking.

Recipe ( from Honey Bee Sweets , adapted from foodnetwork.com)
1 tbsp butter
1 large onion, diced
1 carrot, peeled and diced
1 apple, peeled and diced
2 cups pumpkin, diced and roasted*
1/2tsp dried thyme
1 bay leaf ( omitted )
2 cups chicken stock ( I used vegetable stock )
1 cup of fresh cream ( 1 used about 3 tbsp)
salt and pepper

*To roast the pumpkin, peel and dice the pumpkin, lay them on a baking tray, sprinkle some salt and black pepper and coat with some olive oil. Roast in the oven for 15 minutes or till tender.

Method:
1. In a large pot, melt the butter. Add in the diced onion, carrots and apples. Stir and cook till slightly tender. Add in the dried thyme, bay leaf if using and roasted pumpkin. Continue to cook till mixture is slightly mushy. Add in the stock and cream ( i only put in the cream last )and cook till just boil. Remove from heat and let cool slightly.
2. Remove the bay leaf and blend the mixture till creamy, return the mixture to pot again and heat up. Add salt and pepper to taste. I added the 3 tbsps of cream here. Serve immediately.

Linking this to Recipe Box 23 hosted by Chaya and
Foodie Friday at Simple Living and Eating

Asam Pedas Utara ( Northern Style Hot and Sour Fish )

$
0
0

I find that the northern style of cooking assam dish is rather different from our usual chinese cooking method. It doesnt require sauteing, everything is just boiled to cook. The first time when i cooked this, i find that the taste was rather bland , i couldnt help myself to put in some ajinomoto. The flavours did not come through, all i can taste was just the sourish of the dish. After some feedback and discussion with Wendy, i wanted to cook this again. This time i going to cook in the morning, let it sit for several hours and see if the flavours can develop, at the same time i was also thinking whether to make some fish stock to cook this, then i decided not to, only reduced the water , making it less broth.


It turned out better the second time. Although it's still sourish but at least it's tastier, like eating fish in laksa broth. And using this same recipe, i made laksa too, to be shared in my next post.

Recipe ( from myresipi.com ) with changes
3 whole fish ( i used mabong, mackarel), cleaned and marinate with little salt
7 dried chillies
1/2 big onion
1 clove garlic
some laksa leaves ( daun kesom )
2 stalks torch gingerbud ( bunga kanthan ), halved each
2 pieces asam keping ( tamarind), i soaked in hot water for a few mins
belachan ( shrimp paste)
2 stalks lemongrass, bruised
550ml water
2.5tsp salt
1tsp sugar
ajinomoto ( optional )

Method:
1. Blend or pound dry chillies, onions, garlic and belachan. In a wok, add water and all the blended or pounded ingredients, laksa leaves, lemongrass and the torch gingerbud and bring it to a boil.
2.Add in the fish and the assam keping, simmer at medium low heat for 10 minutes
3.Add sugar and salt or more if needed and a pinch of ajinomoto if using.

I am submitting this post to Malaysian Food Fest, Kedah and Perlis month hosted by Wendyinkk of Table for 2 ...or more

Laksa Kedah

$
0
0

I find that this Laksa Kedah quite resembles Penang Assam Laksa, i also think it's a quickie way to make assam laksa at home. Though i enjoy eating laksa a lot, i will never thought of doing it at home cos i find that
there's usually a lot of work or a long list of ingredients required to make a delicious pot of laksa. Although the broth here tastes quite like assam laksa, the condiments are a little different from the usual Penang Laksa. I referred to a few recipes from the internet and noticed that Laksa Kedah usually comes with hard boiled eggs and some local herbs like daun selom and daun gajus. I couldnt get daun gajus at that time when i made this so i left that out. Also instead of those chunks of fish that comes in the soup like Penang laksa, the fish meat here are blended or mashed till almost fine. Quite a nice bowl of assam laksa if you ask me.


the condiments and the laksa broth

Recipe ( from here and reference from resepi.mesra.net and here )
serves 2
3 whole fish ( i used mabong, mackarel), cleaned and marinate with a little salt
7 dried chillies
1/2 big onion
1 clove garlic
some laksa leaves ( daun kesom )
2 stalks torch gingerbud ( bunga kanthan ), halved each
2 pieces asam keping ( tamarind), i soaked in hot water for a few mins
belachan ( shrimp paste)
2 stalks lemongrass, bruised
900ml water
2.5tsp or more if needed
1tsp sugar
ajinomoto ( optional )
laksa noodles
Accompaniments
hard boiled egg
shredded cucumber
sliced onions
daun selom, shredded
cut chillies

Method:
1. Blend or pound dry chillies, onions, garlic and belachan. In a wok, add water and all the blended or pounded ingredients, laksa leaves, lemongrass and the torch gingerbud and bring it to a boil.
2.Add in the fish and the assam keping, simmer at medium low heat for 10 minutes.* alternatively, you can choose to boil the fish first to cook, then remove its meat.
3.Remove the fish. Remove its meat, mash it a little , discarding the bones and put the mashed meat back into the broth and let it boil again for another 10 minutes. Add ajinomoto ( if using ).Meanwhile, cook the laksa noodles in another pot. 
4.Serve laksa with the shredded cucumber, sliced onions, daun selom, cut chillies and serve in broth.


I am submitting this post to Malaysian Food Fest, Kedah and Perlis month hosted by Wendyinkk of Table for 2..or more

Apple Walnut Mosaic Coffee Cake

$
0
0

Here we are at our 12th bake at THB ( The Home Bakers ) where we are currently baking from the book Coffee Cakes by Lou Seibert Pappas and we have now completed 1/5 of the book! After baking so many recipes from the book, i sort of getting used to Lou's cakes now. Many months ago, when i started baking the first two three recipes from the book, i was a little not used to Lou's style of cakes..to me it's neither the spongy type nor muffin type nor the creamy melt in your mouth type of texture but now as time goes by, knowing her style, i know that her recipes are indeed nice coffee cakes, not coffee flavoured cakes but perfect with coffee or any of your favourite hot drinks and am appreciating her recipes. They can be dense sometimes but always moist. Most of her cakes are typically flavoured with fruits and nuts and with some spices that goes in together or topped with streusel making them a delicious addition. Just like this apple walnut mosaic cake which was chosen by Mich of Piece of Cake, it is incredibly moist and very tasty. I did however skipped the nuts this time. Lou calls this a mosaic cake, i guess the obvious reason is because of the lookalike mosaic effect in the cake with a mixture of apples, nuts and cranberries. Mine didnt turn out to be 'mosaic' enough but i'm fine with that :) I made half a recipe in a small 18cm loaf pan. For full recipe, please hop over to Mich's blog, the host for this bake. Mich  has made these into nice cupcakes with streusel topping and to view group baking, click here.


At the same time, i would like to inform my new found friend, Shannon from Just as Delish is having a cookbook giveaway at her blog. She is offering 3 lucky readers a cookbook worth RM70 to any lucky Malaysian readers. The contest starts from Nov20 till Nov27, 2012. Try your luck, i just did. To find out what cookbook is Shannon giving away and the details of the contest, please click here. Good luck.


Designer Chocolate Baby Grands

$
0
0

If anyone of you who owns this book, "Rose's Heavenly Cakes" and have taken a look at the picture of these Designer Chocolate Baby Grands cupcakes in the book, i'm sure you agree with me that the cupcakes look very attractive, they have a nice flat top and a very smooth glaze.  The cupcake itself is a Chocolate cake,  brushed with chocolate ganache and lastly covered with chocolate glaze and Rose says that this chocolate glaze is the shiniest and most amazing of all chocolate glaze. After making these cupcakes, i also think the glaze indeed  gives the cupcakes a very attractive surface infact the glaze was actually the thing that i'm looking forward to see baking these cupcakes. I'm baking along with my buddies Joyce and Zoe this week and these designer chocolate baby grands were chosen by Zoe, and my dear zoe, i have to tell you this, these cupcakes are the most challenging bakes i've done in recent months!i have to read the recipe few times to understand it :D
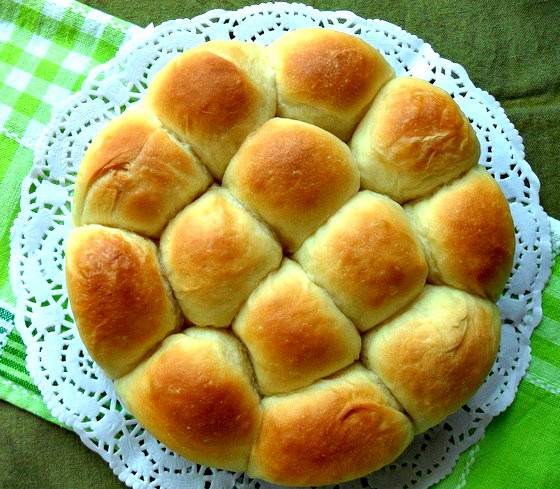
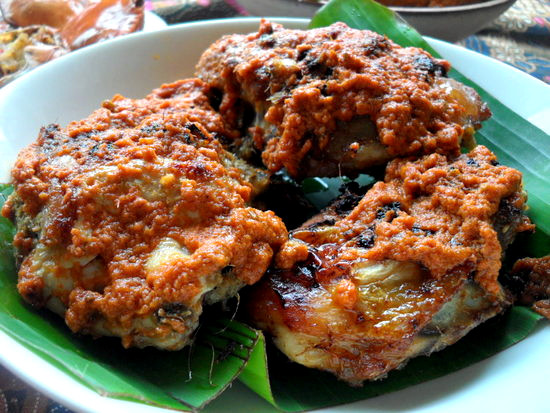
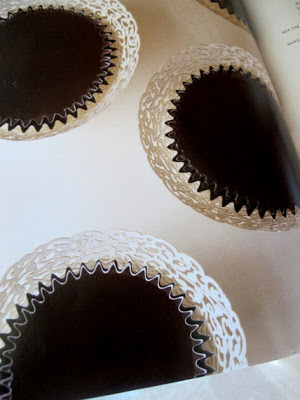
the picture in the book..

Rose is usually very detailed in her recipes and this recipe alone comes in 4 pages. If Zoe didnt pick this recipe, i doubt i will make these cupcakes because of the long recipe and the work involved. Each step requires close monitoring, my half reliable thermometer was put to use here to achieve the consistency of the ganache and glaze that i was looking for. These cupcakes are very very delicious! They are very chocolatey , the crumbs are soft and tender, the ganache and the glaze are just incredibly delicious!even though you find there's chocolate here and there, i dont find it overly rich and that i can have another one after another, oops!
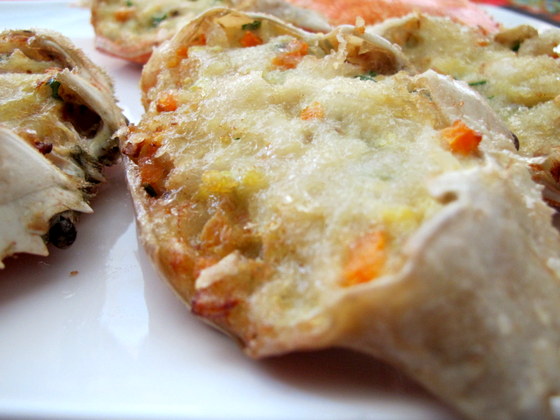
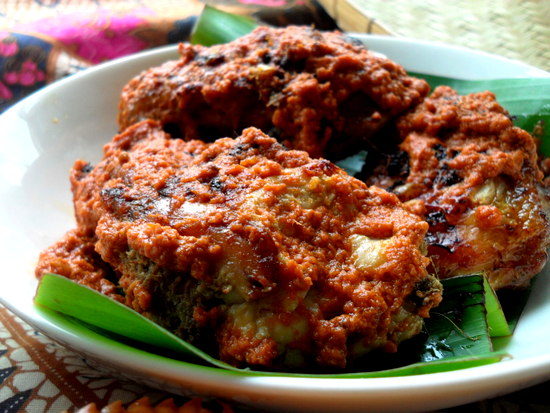
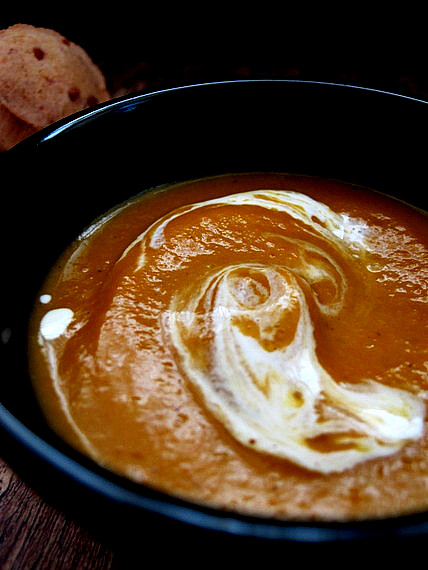
i'm happy with the shining glaze surface


As said, there are 3 parts to these cupcakes, the cake itself, the ganache and the glaze. I made the cake and the ganache on the first day and the glaze on the second day. Though the choc cake base is not difficult to make, there's something tricky about the cake base that i found when i googled and read those who had done this here,here,here and a few more.  It will rise up a lot during baking so if the cake rises very high, it will be a little difficult to apply the glaze at the finishing, you probably ended up no space for the glaze. One of the tips given is pour the cake batter to 20gms for each cupcake, i didnt weigh mine but i poured mine less than half full for each cupcake, it was actually quite little but unfortunately, it still risen up a lot , like a dome and i didnt get a nice flat top for all the cupcakes. The ganache was good and i poured the ganache over instead of brushing it over and over again.  You will have to get the ganache ready when the cake is out from the oven and pour or brush the ganache over when it's warm. And the glaze, they give a good shine, i'm happy :D
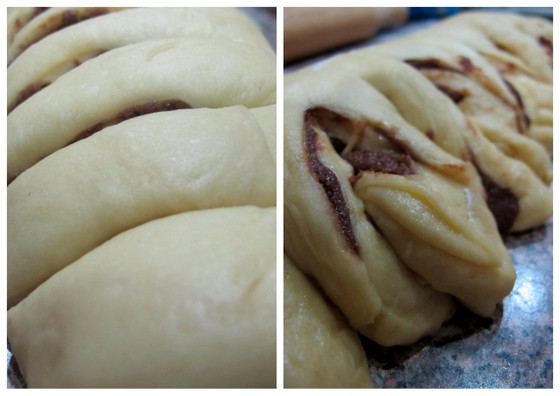
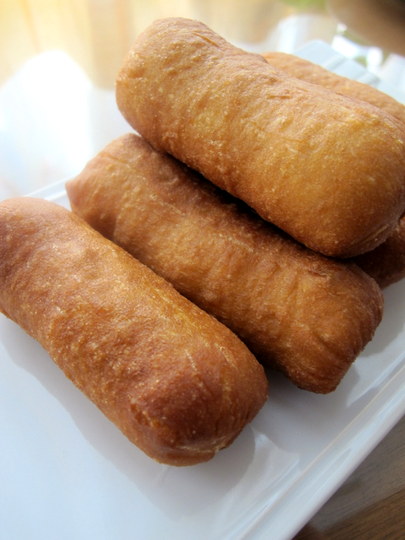
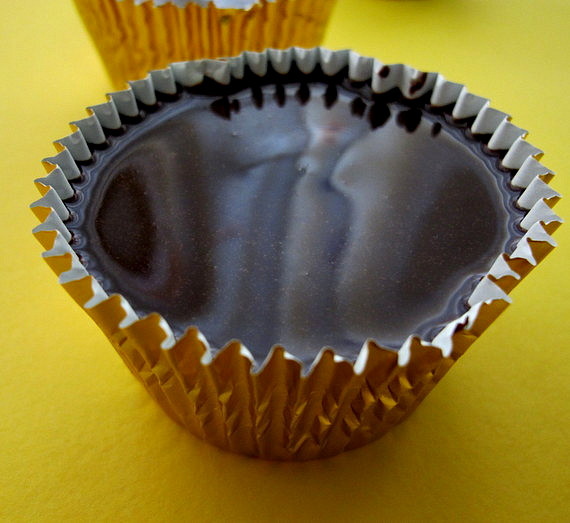


this is one of those that didnt manage to get a flat top, no matter how much ganache and
glaze i poured, it just cldnt hide the dome. 
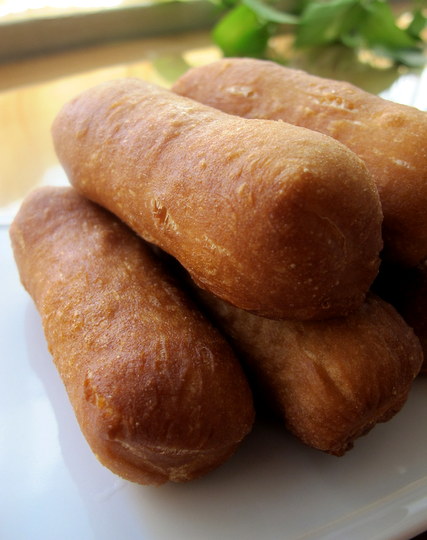
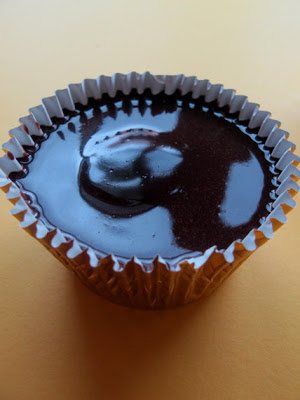

let the ganache seep thru the cake when it's warm, it's so delicious with the chocolate glaze..
Recipe ( from the book Rose's Heavenly Cakes )
Chocolate Cake
33 g unsweetened (alkalized) cocoa powder
1/4 cup boiling water
1/4 cup canola or safflower oil, at room temperature 
2 large eggs, separated, plus 1 additional white, at room temperature
1/2 tsp vanilla extract
75 g cake flour
120 g superfine sugar
1 tsp baking powder
1/2 tsp baking soda 
1/8 tsp salt

Equipment:
14 foil cupcake liners, set in muffin pans

Preheat the oven 20 min or more before baking, set an oven rack in the lower third of the oven and preheat the oven to 350°F/175°C.

Mix the cocoa and liquid ingredients. In the bowl of a stand mixer, by hand, whisk the cocoa and boiling  water until smooth. Cover with plastic wrap to prevent evaporation and cool to room temperature, about 30 min. To speed cooling, place the mixture in the refrigerator. Bring it to room temperature before proceeding.

Add the oil and yolks to the chocolate mixture. Attach the whisk beater. Starting on low speed, gradually raise the speed to medium and beat for about 1 minute, or until smooth and shiny, and resembling a butter-cream. Scrape down the sides of the bowl. Beat in the vanilla for a few seconds.

Mix the dry ingredients. In a medium bowl, whisk together the flours, sugar, baking powder, baking soda, and salt.

Make the batter. Add half the flour mixture to the chocolate mixture. Beat on low speed until the dry ingredients are moistened. Scrape down the sides of the bowl. Add the remain­ing flour mixture. Raise the speed to medium-high and beat for I minute. Scrape down the sides and bottom of the bowl. The mixture will be very thick.

Starting on low speed, add the egg whites. Gradually raise the speed to medium-high and beat for 2 mins. The batter will now be like a thick soup. Using a silicone spat­ula, scrape it into a 2-cup or larger cup with a spout. Pour the batter into the prepared cupcake liners. They will be just under half full, 3/4 inch from the tops.

Bake the cupcakes. Bake for 15 to 20 min, or until a wire cake tester inserted in the centers comes out clean and the cupcakes spring back when pressed lightly in the centers. While the cupcakes are baking, make the ganache syrup. When the cupcakes are baked, set the pans on a wire rack.

Milk Chocolate Ganache Syrup

Makes: about 2/3 cup

85g (3 ounces) milk chocolate, chopped
1/4 cup plus 2 tbsp heavy cream
1/2 tsp vanilla extract

Make the milk chocolate ganache syrup. In a food processor, process the chocolate until very fine. In a 1-cup or larger microwavable cup with a spout (or in a small saucepan over me­dium heat, stirring often), scald the cream (heat it to the boiling point; small bubbles will appear around the periphery). With the motor  of the food processor running, pour the cream through the feed tube in a steady stream. Process for a few seconds until smooth. (Alternatively, grate the chocolate, place it in a small bowl, and stir in the scalded cream until the mixture is uniform in color.)Transfer the chocolate syrup to a bowl and stir in the vanilla.

Apply the syrup.While they are still hot, poke about 12 deep holes in each cupcake with a wooden skewer. Brush the cupcakes with syrup. It penetrates most readily when at least 110°F/43°C almost hot to the touch. If necessary, reheat as it cools by giving it a few seconds on high power in the microwave. Allow them to sit for a few minutes, and then apply more syrup to fill the little holes left by the skewer. Continue applying the syrup until all of it has been used. There should be a thin coating covering the top of each cupcake. Allow the syrup to set until, when touched with a fingertip, it leaves no mark, about 1 hr. ( instead of brushing it with syrup,i poured the ganache over the cupcakes )

Lacquer Glaze

makes: 1 1/3 cups ( i had leftover )
1/4 cup cold water
2 tsp powdered gelatin
133 g sugar
1/3 cup water
28 g golden syrup or corn syrup ( i used golden syrup ) 
66g unsweetened (alkalized) cocoa powder
1/3 cup heavy cream

Make the lacquer glaze. Have ready a fine-mesh strainer suspended over a medium metal bowl. In a small bowl, place the 1/4 cup of cold water and sprinkle the gelatin over the top. Stir to moisten and soften the gelatin and allow it to sit for a minimum of 5 min. Cover tightly with plastic wrap to prevent evaporation and set aside. 

In a small heavy saucepan over medium heat, whisk together the sugar and 1/3 cup of water. Stir constantly with the whisk until the sugar dissolves.

Remove the pan from the heat and, with the whisk, gently stir in the golden syrup and then the cocoa until smooth, making sure to reach into the corners of the pan. The mixture will be glossy. Using a silicone spatula, stir in the heavy cream.

Return the pan to medium heat and, stirring constantly, bring the mixture to the boil­ing point (190°F/88°C). Bubbles will just start to form around the edges.

Remove the pan from the heat and strain the mixture into the medium bowl. Cool slightly, for about 10 minutes. An instant-read thermometer should register 122 to 140°F or 50 to 60°C. With the silicone spatula, stir in the softened gelatin until dissolved completely and no longer streaky.

Strain the glaze into a 2-cup heatproof glass measure or bowl. (Metal will impart an undesirable flavor if the glaze is stored in it.) Cool for a few minutes, stirring very gently so as not to incorporate any air. For these cupcakes, the glaze coats best when just made (80°F/26°C). If the glaze is made ahead and reheated. it will be thicker and should be used at 82 to 85°F or 28 to 29°C.

Use a regular tablespoon (not a measuring spoon) to coat the tops of the cupcakes with the lacquer glaze.  Allow  the glaze to set for about 1 hr, or until just barely tacky when touched lightly with a fingertip.  


get the InLinkz code

Apple Cinnamon Crumble Muffins - Twelve Loaves

$
0
0

Nice breakfast muffins for me. I rarely have muffins for breakfast but i had these on three separate mornings. They are dense and soft and just a little sweet. Some oats on the crumbles here also provide extra bites and texture to these muffins. Maybe it's the psychological thing in me, just a little oats in the bites makes me feel like i'm eating something wholesome. Half of the apples here are grated so if you do not like too much chunks in your muffins, you can consider grating some of them, they still gives a nice moist to the muffins. Most of the time i dont really bother much using salted and unsalted butter in my bakes because sometimes i cant really tell the difference but this time i can actually taste a little saltiness in these muffins, i think it's in the crumbles which surprisingly i find it pleasing and nice. Maybe it's also the butter, Ballantyne..probably they contain more salt? Anyway, these are easy and fast to make, i wish cooking dinner is as fast as making muffins :)


Recipe ( from ABC delicious magazine )
2 green apples, peeled
300gm self raising flour, sifted
80gm sugar
50gm unsalted butter, melted ( i used salted )
2 eggs, lightly beaten
2tbsp milk ( i used diary cream)
1tsp ground cinnamon
cinnamon sugar, to dust ( mixture of cinnamon plus sugar)
honey, to drizzle

Crumble topping
40gm chilled unsalted butter, chopped ( i used salted butter )
50gm self raising flour
2tbsp brown sugar
1tbsp rolled oats

Method:
1.Preheat oven to 180C. Line 8 holes of muffin tray with paper muffin cases.
2.Coarsely grate 1 apple and chop the other. Place the apple in a large bowl with the flour, sugar, butter, eggs , milk or cream and cinnamon. Mix until just combined ( dont overwork or muffins will be tough ). Divide the batter among the paper cases.
3. For the crumble, place the butter, flour, sugar and oats in a large bowl and rub in all together.
4.Scatter crumble over the batter and bake in the oven for 15-20 minutes until the muffins are cooked and golden. Cool in the pan for 5 mins, then transfer muffins to a wire rack to cool completely. Dust with cinnamon sugar and drizzle with honey to serve.


Happy to link this to post to Twelve Loaves ( theme : Autumn Fruits ) hosted by Lora, Cake Duchess and Creative Culinary
and also Recipe Box 25 hosted by Chaya

Spinach and Mushroom Quesadillas

$
0
0

Cook Like A Star blog hop event is back with Martha Stewart, the nominated chef for the month of December. For those of you who are new to this event, it is a blog hop whereby a chef will be nominated and based on the nominated chef, we will be cooking his or her recipes and then link it back to the event.
I'm sure everyone if not, most of us know who Martha Stewart is but not until this event, that i really took a look at her website. I must say that she really has an extensive list of recipes in her website..and then from one recipes it leads to another. With so many recipes to choose from, I actually got no problem finding something to make. It's only time..not that i'm very busy but as year end is approaching, i'm getting lazier and lazier and already in holiday mood. Will see.


Picked a few quick recipes to make and this is one of them. I always enjoy eating tortillas and quickly grab my hands to make this while i was still have the mood to make something. If you look at the picture in martha's site, there's a jar accompanying these quesadillas but it didnt mention what was that. Some said that it's salsa verde and i thought of making that too, bought the ingredients but forgot to make them. I only remembered after eating the quesadillas! Told you i'm in holiday mood..ha!But even without the salsa, i still enjoy eating these a lot. Btw, i just knew that Martha Stewart turned 70 last year when i was googling for her recipes on the website. Doesnt she look amazing at her age? i thought maybe she looks like 15-20 years younger!

Ingredients ( from marthastewart.com )
amount of ingredients was altered to serve 2-3 
1 medium red onion, thinly sliced
11/2 cup button or cremini mushroom, thinly sliced ( i used white button)
3 cups spinach, roughly cut or torn
coarse salt and pepper
4 flour tortillas
shredded cheese ( i used cheddar )
canola oil

Method:
1.Preheat oven to 400F/205C. In a skillet or pan over medium heat, pour a little oil and cook the onions, stirring occasionally, until light golden. Add the mushrooms, cook until they are tender about 5 minutes.
2.Add spinach, let cook until completely wilted and mixture is dry, about 3 minutes. Season with salt and pepper.
3.Brush one side of tortilla with some oil and place oiled side down on a baking sheet. Layer each tortilla with cheese, spinach mixture and more cheese, dividing evenly.Top with another piece of tortilla, oiled sides up and lightly press to seal. Do the same for the remaining 2 pieces of tortilla.
4.Bake until cheese is melted, turning them once, about 10 minutes. To serve, cut quesadillas into quarters or  more.


I'm linking this post to Cook Like A Star organised by Zoe of Bake for Happy Kids, co hosting with Baby Sumo of Eat Your Heart Out and Riceball of Riceball Eats
and also Recipe Box 26 hosted by Chaya

Chocolate Eclairs

$
0
0

Making chocolate eclairs are pretty much the same as making cream puffs or profiteroles except that they are shaped into long shapes instead of round. From our previous bake along with cream puffs as the theme in september, i've seen beautiful puffs baked by those who had  joined us. I decided to use Jasline's cream puffs recipe to make my eclairs this time. The puffs had risen well in the oven and i followed the recipe to bake a little longer to ensure that they stay puffed and crispy. Instead of splitting the choux buns to fill in the filling, i have used a nozzle here to poke hole at the back of the puffs and the pipe in the filling. If the buns have risen well and puffed well ,there will be no problem poking holes onto them and fill them. I have also used the same filling as what i did with my cream puffs the other time , vanilla custard cream . As these are called chocolate eclaires, i have made a simple chocolate sauce just to spoon it on top of the puffs. Eating these were such a treat!

these are the unfilled choux buns after baking..
poke 3 holes at the back of the puffs and pipe in the filling


Recipe ( from foodie baker )
Ingredients for choux buns
100gm milk
40gms butter, softened and chopped
1tsp sugar
1/2tsp salt ( i omitted )
70gms plain flour ( sifted )
100gms eggs , at room temperature whisked together

Method:
1.Combine milk, butter and sugar in a pot. Heat the mixture over medium high heat , stirring it with a wooden spoon and bring to a boil. The mixture should be boiling and bubbling until the layer of butter is no longer floating at the top.
2.Add in the flour all at once, turn off the heat and stir quickly with a wooden spoon. Turn on the heat to medium low and continue mixing with the wooden spoon until mixture turns into a soft dough  and that you can see a layer of dough at the bottom of the pot. Remove from heat and allow dough to cool down a little before adding in the eggs.Once cooled down a little, add the eggs little by little to ensure the dough absorbs the eggs fully. The dough will seem to separate but will come to a smooth paste and piping consistency.
3.Fill the paste into a piping bag with a 1cm wide hole and pipe a squashed 's' shape one on top of another.
Bale at a preheated oven at 200C for 20 minutes, reduce the heat to 175C and bake further for 20 minutes till the puff is golden brown and well risen. Turn off the oven and let the puffs sit in the oven for further 10-15 minutes. Remove from oven and  let the cool completely before putting in the filling.

Filling : vanilla custard cream from Quay Po Cooks
Using a pointed nozzle  or a knife, poke three holes at the back of the cooled puffs and pipe in the filling .
Then spread the chocolate sauce over the top of the eclairs, scattered some chopped toasted pistachios over.

Chocolate sauce
60gms chocolate chips
3tsp whipping cream

heat the chocolate chips over barely simmering water with the whipping cream. Keep stirring until choc has melted. Once cooled a little, spread over the tops of the eclairs.

This will be our last bake for our bake along this year. Thanks to everyone who has joined us baking along this year. We will come back in January with a cream cheese pound cake as our chosen recipe. The recipe can be found at Cake Keeper's Book by Lauren Chattman Page 114 and also here Now let's see how my baking buddies, Joyce and Zoe did their chocolate eclairs and also the rest of who are joining us for this round of bake along.


get the InLinkz code
Viewing all 199 articles
Browse latest View live